How to make your Phone as a Wireless Microphone and Bluetooth TWS as Output in Arch Linux
- bluetoothctl
- TWS
- MIC
Bet. You got an old Samsung A51 lying around? Or maybe you just wanna flex a wireless mic setup without dropping bags on
a Blue Yeti? Say less. This guide is for the Arch Linux gang who wanna use their phone as a mic AND keep their TWS
earbuds connected via bluetoothctl. No cap, this setup is lowkey goated.
The Vibe Check
- PC: Arch Linux (btw) with PipeWire (you got that, right? FR)
- Phone: Samsung A51 (or any Android tbh) with AndroidMic app
- Audio output: Your TWS earbuds (connected via Bluetooth)
- Connection: WiFi (same network, no lag, sheesh)
Step 1: Install the Essentials (Don't Skip, FR)
Open your terminal (you know the drill):
sudo pacman -S pavucontrol bluez bluez-utils pipewire pipewire-pulse wireplumberWhy? pavucontrol = audio manager GOAT. bluez = Bluetooth stuff. PipeWire = modern audio king.
Step 2: Create Virtual Audio Devices (The Secret Sauce)
This is where the magic happens. Run these two commands in order:
# Create a fake speaker (null sink)pactl load-module module-null-sink sink_name=android_mic_sink
# Create a fake mic that listens to that speakerpactl load-module module-remap-source master=android_mic_sink.monitor source_name=android_mic_source
What does this do?
android_mic_sink= a ghost speaker. Your phone will "play" audio into it.android_mic_source= a ghost mic. Discord/Telegram/Google Meet will think it's a real mic.
Ngl, if you skip the second command, you'll be stuck like "why my virtual mic not showing?" So don't skip it, bestie.
Step 3: Pair Your TWS Earbuds via bluetoothctl (No More "Connecting..." Hell)
Let's get those earbuds locked in:
bluetoothctlpower onagent ondefault-agentscan on # wait for your TWS to show up, then Ctrl+C to stoppair XX:XX:XX:XX:XX:XX # replace with your earbuds' MACtrust XX:XX:XX:XX:XX:XX # this makes them auto-connect laterconnect XX:XX:XX:XX:XX:XXquitPro tip: If your TWS keep disconnecting, add this to /etc/default/grub inside GRUB_CMDLINE_LINUX_DEFAULT:
btusb.enable_autosuspend=n
Then run sudo grub-mkconfig -o /boot/grub/grub.cfg and reboot. That's the "stop sleeping on me" fix.
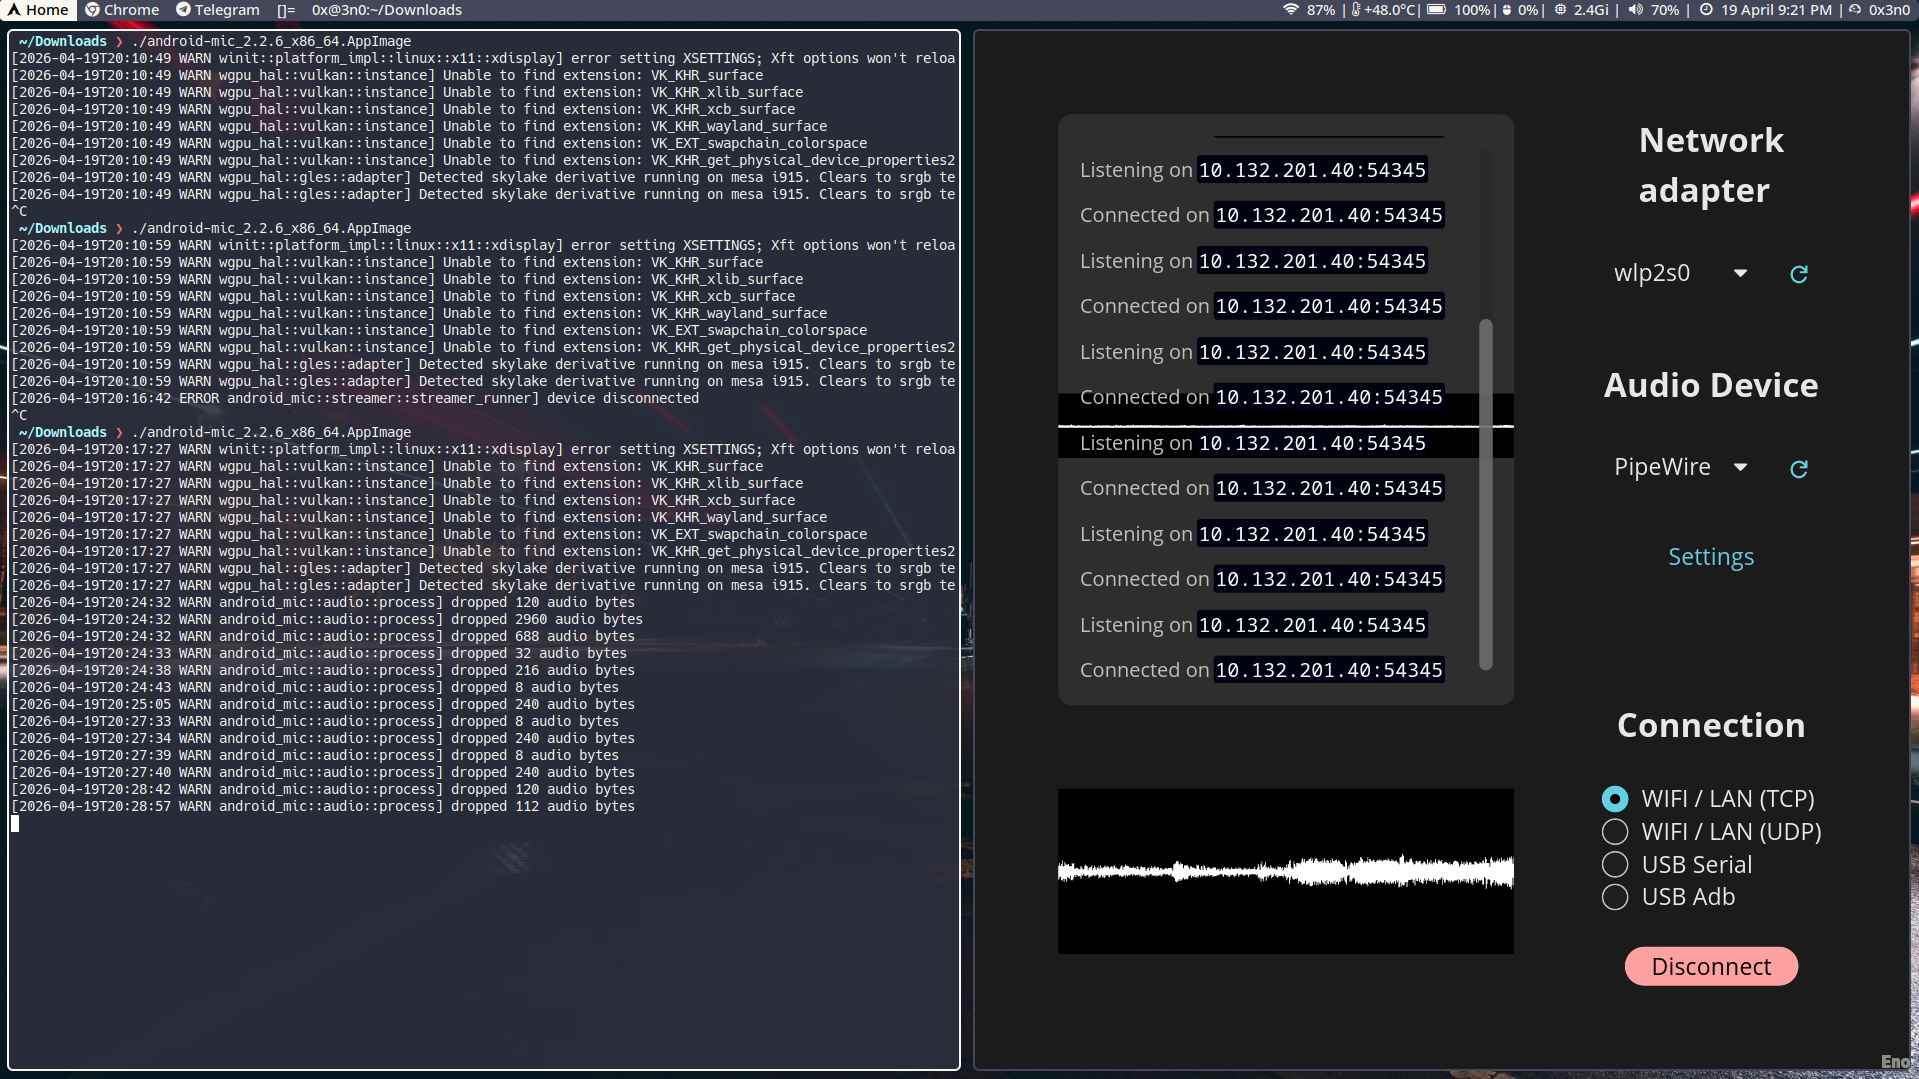
Step 4: Download & Run AndroidMic on Your PC
Go to AndroidMic releases on GitHub, grab the .AppImage
file. Then:
chmod +x AndroidMic-*.AppImage./AndroidMic-*.AppImageIn the GUI:
- Network adapter: pick your WiFi interface (like
wlp2s0with your local IP, e.g., 10.132.x.x) - Audio Device:
Default ALSA Output (currently PipeWire Media Server) - Connection:
WIFI / LAN (TCP)(UDP is faster but risky, no cap) - Click Connect. It'll show an IP and port like
10.132.201.40:12345. Remember that.
Step 5: Connect Your Phone (EZ)
- Open AndroidMic app on your Samsung A51.
- Type in that IP and port from your PC.
- Tap Connect.
- If it says "Connected" on PC, you're winning.
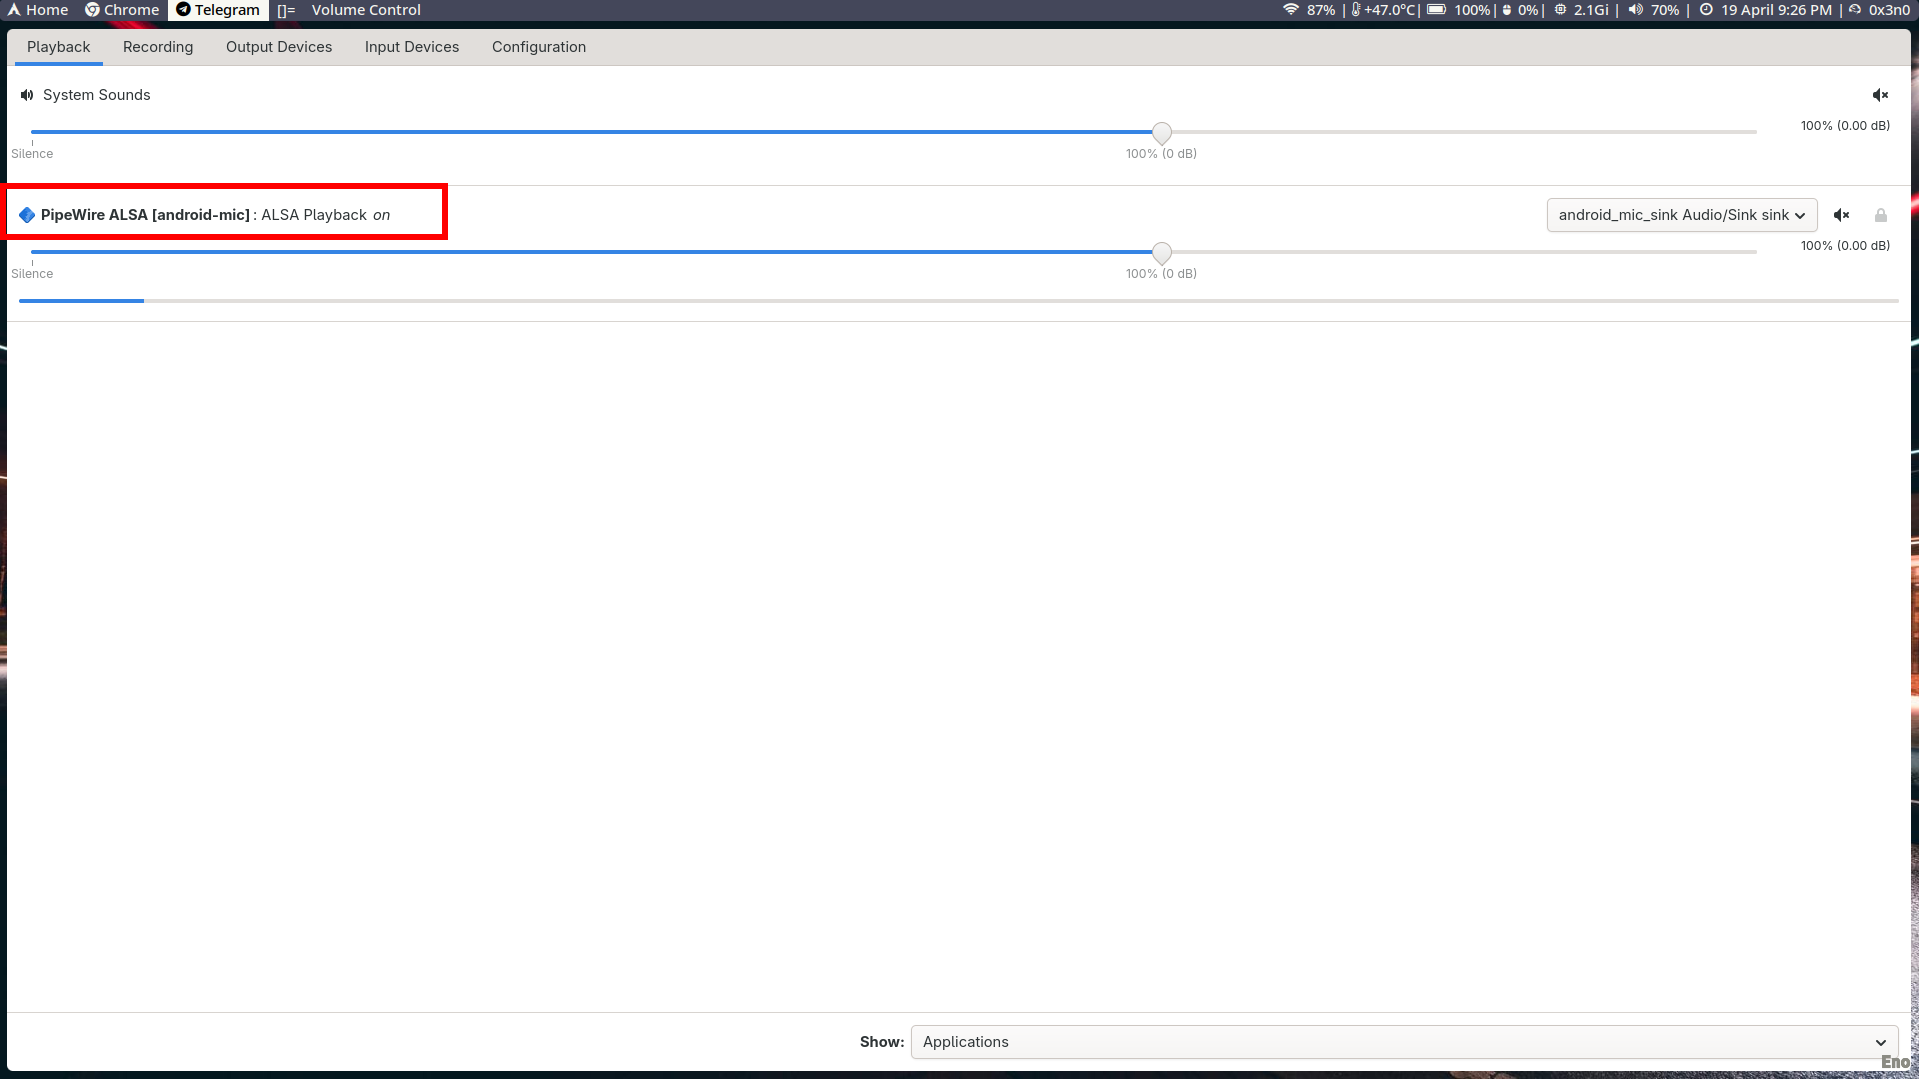
Step 6: Route That Audio Like a Pro (The pavucontrol Dance)
Open pavucontrol:
pavucontrolNow do this:
- Playback tab → find "PipeWire ALSA [android-mic]: ALSA Playback on" → click the dropdown button (speaker
icon) → select
android_mic_sink(NOT your TWS or speakers). - Recording tab → when you're on a call in Discord/Telegram, make sure the input device is
android_mic_source. You can also set it as default:pactl set-default-source android_mic_source - Output Devices tab → make sure your TWS is selected as the output for system sounds (so you can hear your friends while using your phone as mic).
Wait, my TWS mic?
If you wanna use your TWS's built-in mic instead of the phone, just change the input device in your app to your TWS's
"Headset" profile. But this guide is for using the PHONE as mic, so we ignore that.
Step 7: Test in Apps (No Cap, It Works)
- Discord: User Settings → Voice & Video → Input Device =
android_mic_source. Output = your TWS. - Telegram: Settings → Advanced → Voice Calls → Microphone =
android_mic_source. - Google Meet: Click the three dots → Settings → Microphone =
android_mic_source.
Sheesh. Now you're the main character with a wireless mic setup that cost you $0 extra.
Bonus: Make It Survive Reboots (Auto-load Virtual Devices)
Add this to your ~/.bashrc or ~/.profile:
if ! pactl list sinks short | grep -q android_mic_sink; then pactl load-module module-null-sink sink_name=android_mic_sink pactl load-module module-remap-source master=android_mic_sink.monitor source_name=android_mic_sourcefiOr create a systemd user service if you're extra. But the bashrc method is lowkey enough.
Troubleshooting (For When Things Go Rizzless)
| Problem | Fix (No panic) |
|---|---|
android_mic_source not showing in apps | Did you run the second pactl command? Check pavucontrol Input Devices tab. |
| Audio from phone but can't hear in call | Go to Recording tab in pavucontrol → set app's input to android_mic_source. |
| AndroidMic won't connect | Check firewall? Same WiFi? Try restarting app on phone and PC. Or use USB ADB mode instead. |
| TWS disconnects after a while | Add btusb.enable_autosuspend=n to kernel params as shown above. |
| Everything works but mic volume too low | In pavucontrol → Input Devices → increase volume for android_mic_source. |
Final
You just turned your old Samsung A51 into a pro-level wireless microphone on Arch Linux, while still vibing with your TWS earbuds. That's what we call a "budget slay." No need to buy a Blue Yeti or a standalone mic. Your phone + Arch + AndroidMic = infinite rizz.
Now go flex on your Discord homies. And remember: virtual devices first, then connect AndroidMic, then route audio in pavucontrol. That's the cheat code.
Catch you on the flip side, king/queen/nonbinary royalty.